
Replacing the steering wheel position sensor 2000+
 01-17-2010, 05:01 PM
#1
Senior Member
True Car Nut
Thread Starter
Join Date: Jan 2009
Location: Dover, NH
Posts: 7,122
Likes: 0
Received 0 Likes
on
0 Posts

This is usually the primary reason for the Service Stability System notices in your DIC on the 2000+ Bonnevilles and since that was one of the issues with mine I decided to take some pictures of the step by step walk through on how to get into the column to replace it and save ya'll $180+ by going to the dealerships to get it replaced.....
Part $88.00
time about 2 hours


here is your starting point after you disconnect your battery (under the back seat)

gently pull towards you and up to get the knee bolster off

this will reveal the metal frame work of the column area

next you will go to the bottom of the frame and there are two 7mm hex screws and a Christmas tree (barbed fastener) to remove this will drop the lower shield of the colum area


next unplug floor light and remove interior temp sensor


remove panel and disconnect airbag connector

next will be to remove the metal frame from the dash assembly by removing the four 13mm bolts and lifting up and it will come off
below you will see a metal bar going across holding two large plugs. remover the two 13mm bolts and lift up. this will remove it from the dash. then disconnect the plug on the right

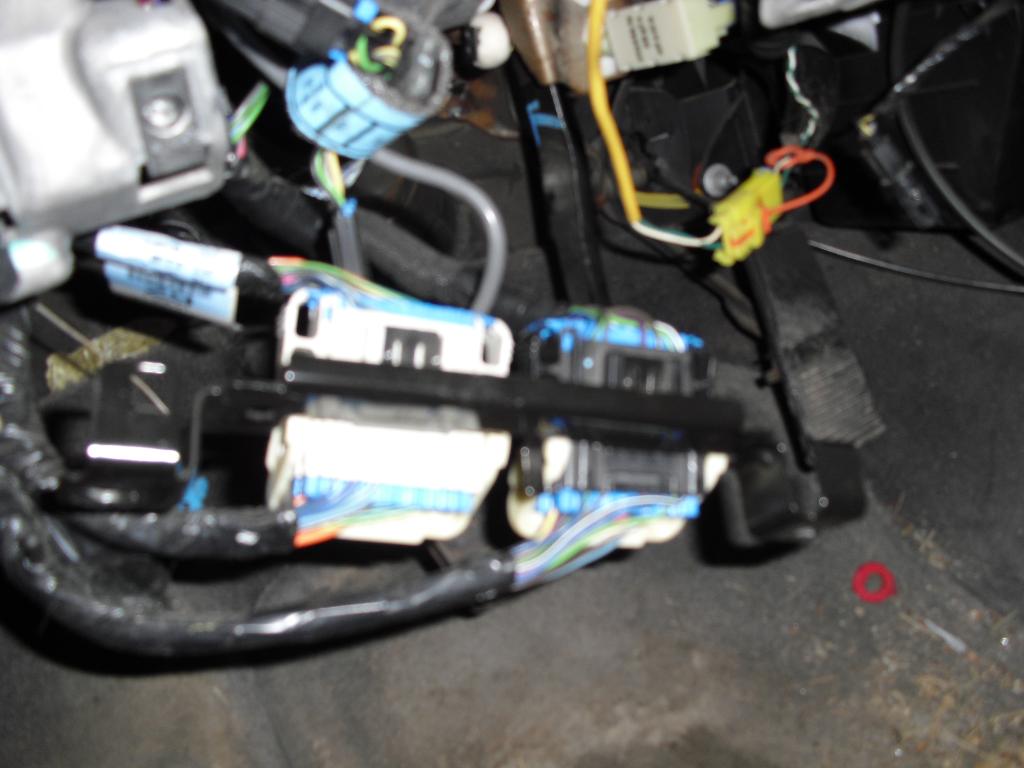

you will also see a round shaped foam padded harness put a small screw driver into the side with the gray wrapped wire set and remove plug

next up is to remove the trim bezel around the gauges and radio. to do this there are two plastic rivets in the top in front of the cluster. use a small screw driver to push in the center of them and them gently pull them from the bezel


then pull on the bottom of the bezel and the clips will release do this all around the bezel. put wheel in all the way down position and lean the top of the bezel towards you and it will come out.
next is the shroud of the column.
To remove this you will need a T-25 bit and a universal driver. there are two torx head screws under the column shroud that need to be taken out.


pull the rubber off the lower shroud


now you can get the lower shroud off. will have to twist it around the tilt lever.

once that is off there is an external torx screw on the right side of the upper shroud in front of the wiper switch you will need an E-6 socket to remove this. Once it is removed gently push the cover back a little bit and lift up and off she comes

now you can look through the steering wheel and see two of the four studs holding the column up. when removing the nut from these use a 13mm wrench and a E-7 socket so the studs do not come out of the frame work (trust me you don't want that)

once the nuts are removed the column is free to drop down. the next really fun part is getting the bolt and nut out of the lower shaft that connects it to the intermediate shaft will have to slice the lower dust shield for good access.


then the column comes out nice and easy.

when it is out stand it up on the wheel so it is vertical to work on and wiggle the long black dust shield side to side to release the clips

now the steering wheel position sensor is visible
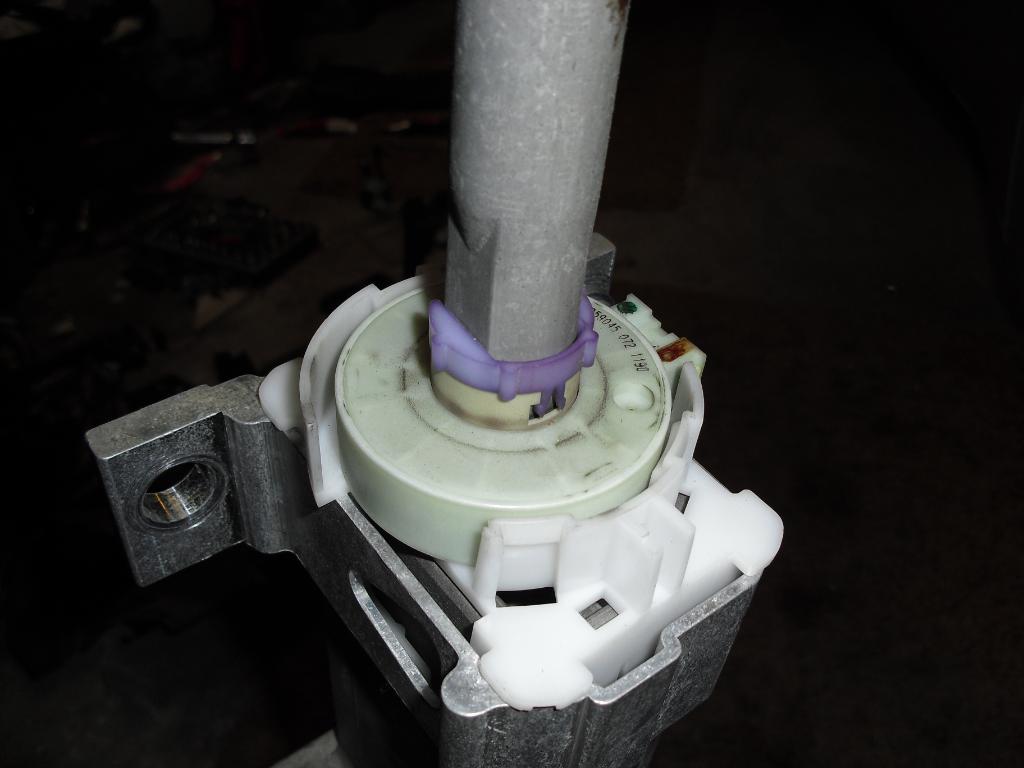
remove the alignment clip and wiggle the sensor loose and pull straight up.
the new sensor has a black pin in it to hold it'* alignment DO NOT remove it at this time.
Slide the new sensor on the shaft and turn it until you can get the purple locking tab aligned correctly and secure it in place.

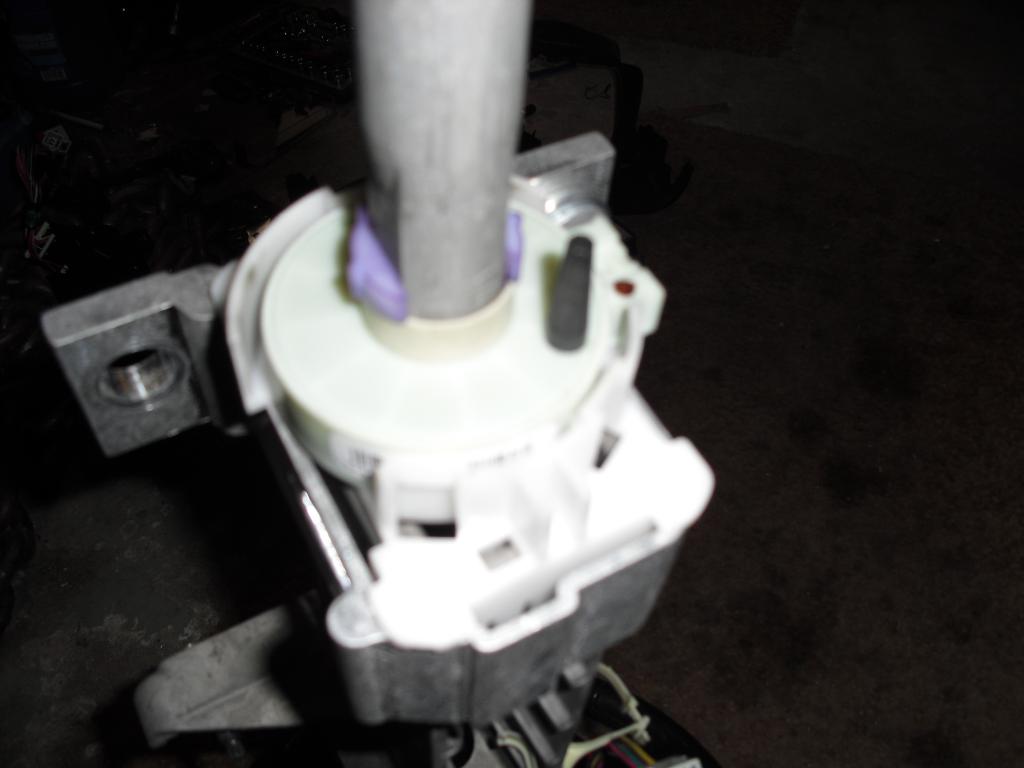
now you can remove the pin and reverse the procedure to reinstall the column and dash
Part $88.00
time about 2 hours
here is your starting point after you disconnect your battery (under the back seat)
gently pull towards you and up to get the knee bolster off
this will reveal the metal frame work of the column area
next you will go to the bottom of the frame and there are two 7mm hex screws and a Christmas tree (barbed fastener) to remove this will drop the lower shield of the colum area
next unplug floor light and remove interior temp sensor
remove panel and disconnect airbag connector
next will be to remove the metal frame from the dash assembly by removing the four 13mm bolts and lifting up and it will come off
below you will see a metal bar going across holding two large plugs. remover the two 13mm bolts and lift up. this will remove it from the dash. then disconnect the plug on the right
you will also see a round shaped foam padded harness put a small screw driver into the side with the gray wrapped wire set and remove plug
next up is to remove the trim bezel around the gauges and radio. to do this there are two plastic rivets in the top in front of the cluster. use a small screw driver to push in the center of them and them gently pull them from the bezel
then pull on the bottom of the bezel and the clips will release do this all around the bezel. put wheel in all the way down position and lean the top of the bezel towards you and it will come out.
next is the shroud of the column.
To remove this you will need a T-25 bit and a universal driver. there are two torx head screws under the column shroud that need to be taken out.
pull the rubber off the lower shroud
now you can get the lower shroud off. will have to twist it around the tilt lever.
once that is off there is an external torx screw on the right side of the upper shroud in front of the wiper switch you will need an E-6 socket to remove this. Once it is removed gently push the cover back a little bit and lift up and off she comes
now you can look through the steering wheel and see two of the four studs holding the column up. when removing the nut from these use a 13mm wrench and a E-7 socket so the studs do not come out of the frame work (trust me you don't want that)
once the nuts are removed the column is free to drop down. the next really fun part is getting the bolt and nut out of the lower shaft that connects it to the intermediate shaft will have to slice the lower dust shield for good access.
then the column comes out nice and easy.
when it is out stand it up on the wheel so it is vertical to work on and wiggle the long black dust shield side to side to release the clips
now the steering wheel position sensor is visible
remove the alignment clip and wiggle the sensor loose and pull straight up.
the new sensor has a black pin in it to hold it'* alignment DO NOT remove it at this time.
Slide the new sensor on the shaft and turn it until you can get the purple locking tab aligned correctly and secure it in place.
now you can remove the pin and reverse the procedure to reinstall the column and dash


Thread
Thread Starter
Forum
Replies
Last Post
compyelc4
2000-2005
1
01-14-2007 04:24 AM