Cleared Tail lights WITHOUT cutting
 09-16-2008, 01:07 AM
#1
Junior Member
Posts like a V-Tak
Thread Starter
Join Date: Sep 2008
Location: Phoenix, AZ
Posts: 26
Likes: 0
Received 0 Likes
on
0 Posts

I was looking all over the threads about clearing the light assemblies for the '00 SSEi. I though I'd tackle the fronts first, and if that went well, I'd graduate myself to the rears. Fronts went off without any problems...I even saved the amber inserts!
Picasa Web Albums - Chad - Car pics
For the rears, I didn't like the idea of all that cutting into the plastic (inevitable leaks, cracks, etc.) so I thought of a different way. Living in AZ has it'* perks...Bright HOT sun! I laid each part out in the sun for about 20 minutes and took a temp reading - 150 degrees. That seemed hot enough to help me break the seals on the rear tail light assemblies. It'* not for the faint-of-heart, though...plenty of cracking and creaking going on...
Here are some pics...
If you GENTLY pry behind the gasket you can get the seal to pop somewhere. Then I stuck in a screwdriver and widened the gap. Sometimes the glue is thick so I used a carpenter'* knife to cut the strong bond.
Picasa Web Albums - Chad - Car pics
Picasa Web Albums - Chad - Car pics
Picasa Web Albums - Chad - Car pics
With CAREFUL attention, you can open it up enough to extract the amber lens. Better still, you remove it in one piece to it could be put back in if need be...
Picasa Web Albums - Chad - Car pics
After that I just ran a small bead of silicone inside where I cut out the old adheasive, clamped it together with some painters tape for a few hours, and reinstalled...
Picasa Web Albums - Chad - Car pics
I was even able to use this technique for the center piece from the trunk lid. A WORD OF CAUTION>>> Be very careful prying against the acrylic, as I have a small area that actually de-laminated from the pressure. Be sure to take your time...It worked out very nicely for me!
Picasa Web Albums - Chad - Car pics
For the rears, I didn't like the idea of all that cutting into the plastic (inevitable leaks, cracks, etc.) so I thought of a different way. Living in AZ has it'* perks...Bright HOT sun! I laid each part out in the sun for about 20 minutes and took a temp reading - 150 degrees. That seemed hot enough to help me break the seals on the rear tail light assemblies. It'* not for the faint-of-heart, though...plenty of cracking and creaking going on...
Here are some pics...
If you GENTLY pry behind the gasket you can get the seal to pop somewhere. Then I stuck in a screwdriver and widened the gap. Sometimes the glue is thick so I used a carpenter'* knife to cut the strong bond.
Picasa Web Albums - Chad - Car pics
Picasa Web Albums - Chad - Car pics
Picasa Web Albums - Chad - Car pics
With CAREFUL attention, you can open it up enough to extract the amber lens. Better still, you remove it in one piece to it could be put back in if need be...
Picasa Web Albums - Chad - Car pics
After that I just ran a small bead of silicone inside where I cut out the old adheasive, clamped it together with some painters tape for a few hours, and reinstalled...
Picasa Web Albums - Chad - Car pics
I was even able to use this technique for the center piece from the trunk lid. A WORD OF CAUTION>>> Be very careful prying against the acrylic, as I have a small area that actually de-laminated from the pressure. Be sure to take your time...It worked out very nicely for me!
 09-16-2008, 02:21 AM
#2
Senior Member
Posts like a 4 Banger
Join Date: Sep 2008
Location: Montgomery County MD
Posts: 121
Likes: 0
Received 0 Likes
on
0 Posts
Front and rear lights looks GREAT with out the yellow. I think i will do this next on mine!! I hate break things but this one looks challenging. Nice work! Any leaks by any chance?


 09-16-2008, 05:34 PM
#4
Junior Member
Posts like a V-Tak
Thread Starter
Join Date: Sep 2008
Location: Phoenix, AZ
Posts: 26
Likes: 0
Received 0 Likes
on
0 Posts
[QUOTE]Front and rear lights looks GREAT with out the yellow. I think i will do this next on mine!! I hate break things but this one looks challenging. Nice work! Any leaks by any chance?[QUOTE]
We don't get a ton of rain here in AZ, but when I wash it later today/tomorrow I will watch those areas very closely. Seeing as the process for clearing the rears without cutting is more internal anyway, I don't see any real issues. It'* all about the process... Behind the acrylic is a gasket, and right behind that is a "U" shaped channel that a "T" shaped piece locks into. This is where the bond is, and it'* pretty tight, so TAKE YOUR TIME. But, once you see what I'm talking about, you'll understand.
I just made sure to add lots of RTV silicone sealant inside the "U" channel to make sure.
09-18-2008, 09:57 PM
#5
Junior Member
Posts like a V-Tak
Thread Starter
Join Date: Sep 2008
Location: Phoenix, AZ
Posts: 26
Likes: 0
Received 0 Likes
on
0 Posts
I read that many people are concerned about the legality of clearing the headlights and rear tail lights...Take a look at many of the new model years vehicles from Lexus and BMW...
Most all of the "sportier" cars are already cleared...Heck our 2004 VW Touareg has cleared lights with amber bulbs. So I really don't see the need to worry...
Most all of the "sportier" cars are already cleared...Heck our 2004 VW Touareg has cleared lights with amber bulbs. So I really don't see the need to worry...
09-18-2008, 10:12 PM
#6
Junior Member
Posts like a V-Tak
Thread Starter
Join Date: Sep 2008
Location: Phoenix, AZ
Posts: 26
Likes: 0
Received 0 Likes
on
0 Posts
Anyone local to AZ who wants to see what I did on these lights, PM me with your info and we'll try to arrange a time to meet up.
09-18-2008, 10:48 PM
#8
Junior Member
Posts like a V-Tak
Thread Starter
Join Date: Sep 2008
Location: Phoenix, AZ
Posts: 26
Likes: 0
Received 0 Likes
on
0 Posts
You know...I don't really know - But we can find out.
When you take off the rear tail light assembly (should be pretty easy to take it off to look at it)
look for a gasket running around the assembly right behind the clear acrylic face, which is laminated to the black substrate. If this is the same setup, you should be in business
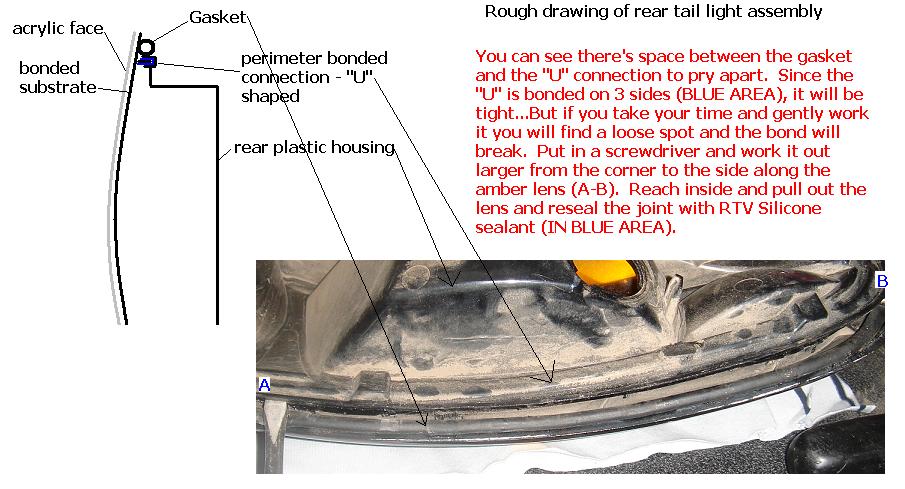
You should be able to wedge in a screwdriver between the gasket and the black plastic backing the light assembly. This backing is perimeter bonded to the acrylic face, so you'll have to look for small areas that may pry off easier. Here'* a rough picture of the area...
When you take off the rear tail light assembly (should be pretty easy to take it off to look at it)
look for a gasket running around the assembly right behind the clear acrylic face, which is laminated to the black substrate. If this is the same setup, you should be in business
You should be able to wedge in a screwdriver between the gasket and the black plastic backing the light assembly. This backing is perimeter bonded to the acrylic face, so you'll have to look for small areas that may pry off easier. Here'* a rough picture of the area...