Evap line from fuel pump
 Yesterday, 12:35 PM
#1


I have a 2004 Regal LS with a 3.8 liter engine. I had to replace the fuel level sensor. When I was installing the three lines that go to the fuel pump I found the evap line was missing. Apparently while moving the lines around during R&R of the fuel pump the evap line slid away from the pump location. Is there a particular place I can look to return the line to the pump?

The following 2 users liked this post by mlan12:
C21nyrpr (Today),
CathedralCub (Yesterday)
Yesterday, 04:44 PM
#2
Senior Member


True Car Nut

Operation CHARM: Car repair manuals for everyone.
Home >> Buick >> 2004 >> Regal V6-3.8L VIN K >> Repair and Diagnosis >> Powertrain Management >> Emission Control Systems >> Evaporative Emissions System >> Evaporative Emission Control Canister >> Service and Repair
REMOVAL PROCEDURE
1. Remove the fuel tank.
IMPORTANT: The fuel tank may need to be partially lowered to gain access to the evaporative emission (EVAP) canister.
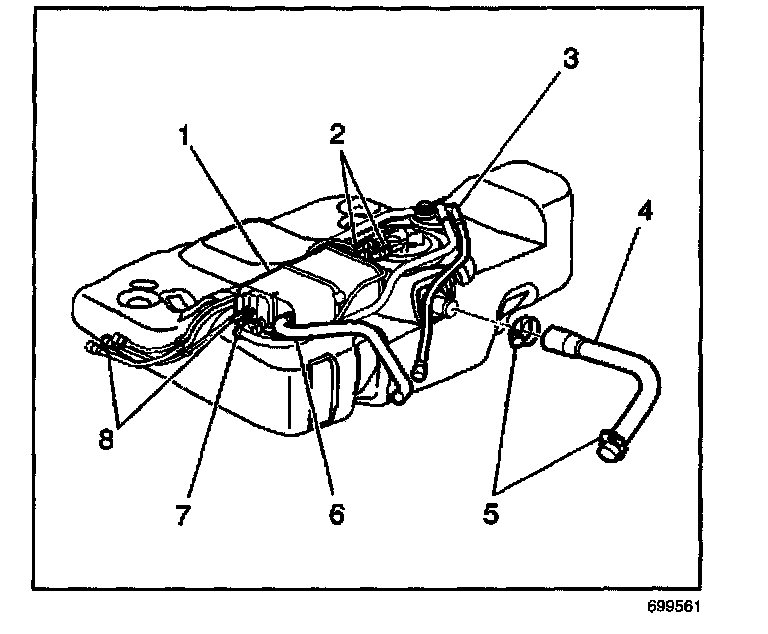
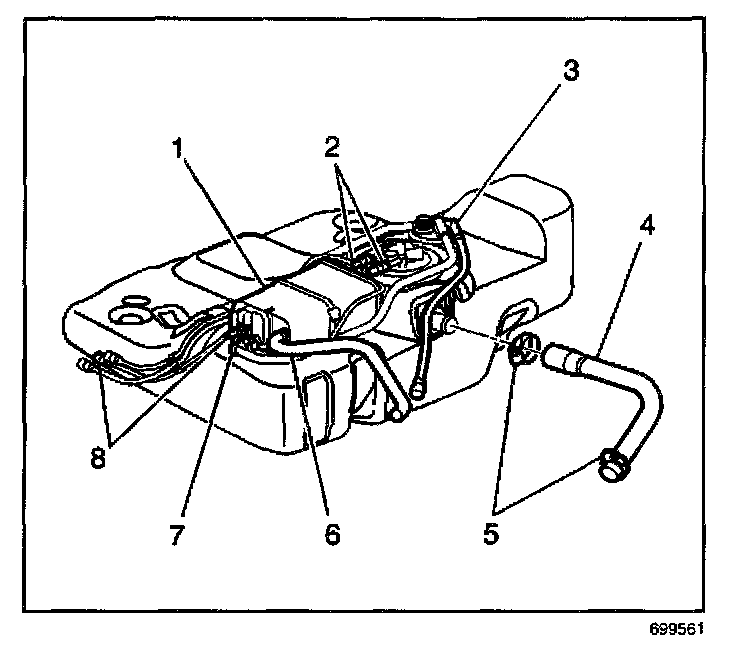
2. Disconnect the EVAP vent hose (6), the EVAP purge pipe ( , and the EVAP vapor pipe (7) from the EVAP canister (1).
3. Release the EVAP canister retaining strap.
IMPORTANT: Replace the retaining strap when replacing the EVAP canister.
4. Remove the EVAP canister (1) from the fuel tank.
INSTALLATION PROCEDURE
1. Position the EVAP canister (1) on the fuel tank.
2. Install the new EVAP canister retaining strap.
3. Connect the EVAP vent hose (6), the EVAP purge pipe (, and the EVAP vapor pipe (7) to the EVAP canister (1).
NOTE:
- Do not attempt to straighten kinked nylon pipes. Replace any kinked nylon pipes in order to prevent damage to the vehicle.
- Do not attempt to repair sections of nylon pipes. Replace damaged nylon pipes.
- Replace the vapor pipes with original equipment or parts that meet GM specifications.
- Replace the vapor hoses with original equipment or parts meeting GM specifications. Use only reinforced fuel-resistant hose identified with the word Fluoroelastomer or GM 6163M on the hose.
1. Install the fuel tank.
pro multis � About Operation CHARM
Home >> Buick >> 2004 >> Regal V6-3.8L VIN K >> Repair and Diagnosis >> Powertrain Management >> Emission Control Systems >> Evaporative Emissions System >> Evaporative Emission Control Canister >> Service and Repair
Evaporative Emission Control Canister: Service and Repair
EVAPORATIVE EMISSION (EVAP) CANISTER REPLACEMENTREMOVAL PROCEDURE
1. Remove the fuel tank.
IMPORTANT: The fuel tank may need to be partially lowered to gain access to the evaporative emission (EVAP) canister.
2. Disconnect the EVAP vent hose (6), the EVAP purge pipe (
3. Release the EVAP canister retaining strap.
IMPORTANT: Replace the retaining strap when replacing the EVAP canister.
4. Remove the EVAP canister (1) from the fuel tank.
INSTALLATION PROCEDURE
1. Position the EVAP canister (1) on the fuel tank.
2. Install the new EVAP canister retaining strap.
3. Connect the EVAP vent hose (6), the EVAP purge pipe (
NOTE:
- Do not attempt to straighten kinked nylon pipes. Replace any kinked nylon pipes in order to prevent damage to the vehicle.
- Do not attempt to repair sections of nylon pipes. Replace damaged nylon pipes.
- Replace the vapor pipes with original equipment or parts that meet GM specifications.
- Replace the vapor hoses with original equipment or parts meeting GM specifications. Use only reinforced fuel-resistant hose identified with the word Fluoroelastomer or GM 6163M on the hose.
1. Install the fuel tank.
pro multis � About Operation CHARM

The following users liked this post:
CathedralCub (Yesterday)
Yesterday, 11:34 PM
#3
Thank you very much for your reply. I decided to try one more time this afternoon and found the missing line. Looking from the rear forward the line was at about the eleven o'clock position. The end of the line was barely within reach. It took a little coaxing but it finally came loose. Thank you again for your help.
The following users liked this post:
carfixer007 (Today)

Thread
Thread Starter
Forum
Replies
Last Post