
Buick Regal Mods - BillBoost Style
 02-17-2011, 06:55 AM
#1
DINOSAURUS BOOSTUS


Expert Gearhead
Thread Starter

Brought over to keep everything on one forum. Here'* the list of the goodies.
As of 05/22/2010 it looks like this.

I'm planning on getting a 2000+ Regal with sunroof and fold down back seat. While I look for the car, I've started picking up parts that I want to be on the car. These mods will go on the car that will become the DD for two or three years. I'm pulling parts together as I find them and appreciate opinions on whether things are good/bad/no difference from stock etc. Parts I already have are bolded.
Car: Purchased 4/30/2010

Sways:
GMPP front and rear bars. They are in the pic somewhere.

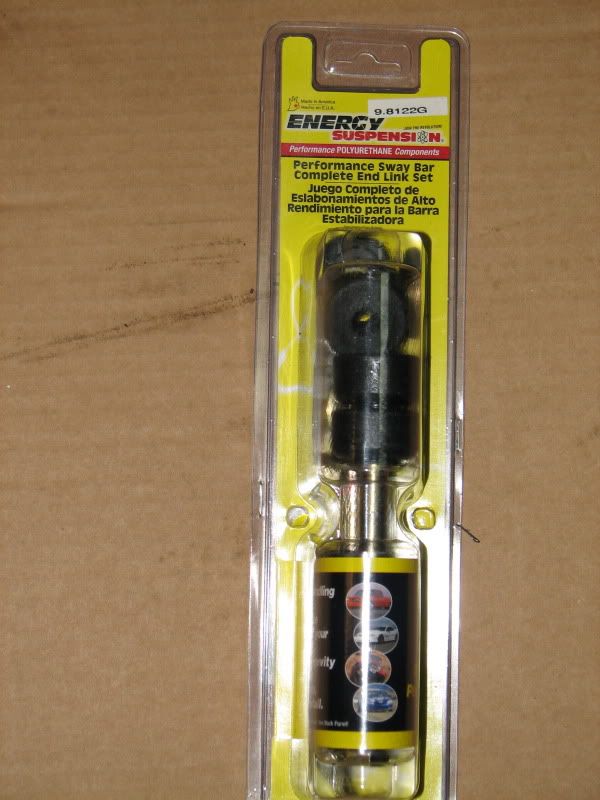
EndlinksFront: Energy Suspension urethane 9.8122G (G denotes black, R is for red)
Rear: Moog K662 (Same ones Rob used)

Center bushings The W body guys swear the center sway bushings make more of a difference than the end links. I've done both on the Bonnie, and the centers did make a much bigger difference.
Front: Energy Suspension urethane 3.5131G (I considered the greaseable, ES only offers 33mm and 35mm)
Rear: Energy Suspension urethane 9.5123G


Dorman Control Arms: These are GTP control arms. The subframe, sways and everything being new bushing wise facilitated me ordering them for $72 each from Rockauto.

F body brakes: One question was raised by a buddy. Will the spare fit if a tire is shot? No, but you shouldn't run a spare on the front of a FWD, therefore you swap a rear to the front and there is no fitment issues, or use a Bonneville spare.


Drilled Slotted Rotors: R1 Concepts, a set of scorched (no break in or bedding) pads were picked up with the rotors. Update 11/9/10 the rotors have been on for a good 6 months and show no signs of rust. I am pleased with them in all respects so far.

Painted to clean and hide them from sight when they are on the car.


Rear brakes: Decided to go with 05-08 GP rear brakes. The E brake is built into the caliper, whereas the Regal E Brake is an inner drum on the disc setup. They are a direct bolt up.


Stainless Goodridge brake lines: I've done the research on spongy brakes after upgrading.
GXP brake pedal:Another item to help fight a lower pedal due to the caliper pistons using more fluid. It has a different rate and therefore the pedal grabs at the same point as before. Many say the lower pedal is not material, I'm going all the way though. Chosen not to do this mod after feeling the pedal....there is no need in my mind.
Strut tower bars: Front and rear both. Happened to find a set with the Don Rome brackets.

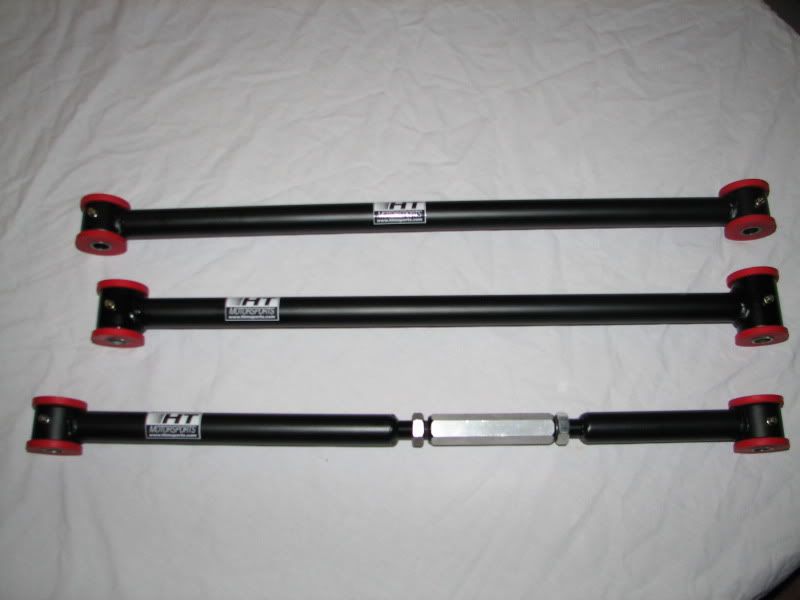
Trailing Arms, Lateral Arms, Toe Links: http://www.westshorefabricators.com/WBody/index.htm
Compared to BMR the quality seems to be equal with $200 less price tag. These have arrived, I'm beyond impressed.
Full poly engine mounts: Thanks to WBS for a great black friday sale. This is the dogbone, front mounts, both trans and engine mounts. IIRC I ordered them in black to keep them from standing out. One item to note is that the engine mount being solid means it'* simply an unfilled hydrauilic. I found it necessary to add 1/2" spacer to the mount with the aluminum subframe to maintain proper height.

Installed in mounts, I retapped the bolt holes and lubed them to keep them nice until install time.

Struts and drop: I have a set of KYB GR2 rear struts and mounts. A 1" drop would help the handling. Picked up a set of matching struts for the front with mounts. I decided to go with Vogtland springs for a .9" drop.


Aluminum W body oil pan w/mount as part of it: If you've never seen the big bracket on a W body that surrounds the oil pan and nearly makes changing the gasket a major pain. This pan has the mount attached to it and will be much easier to work with overall.

Cleaned and put new solid mount on it.


Aluminum cradle: Found in the Monte'* and some Impala'* the aluminum cradle weighs about 25-35 lbs lightger and is said to be stronger. As well, it will facilitate swapping the oil pan. Actual weight of this cradle is 44lbs.


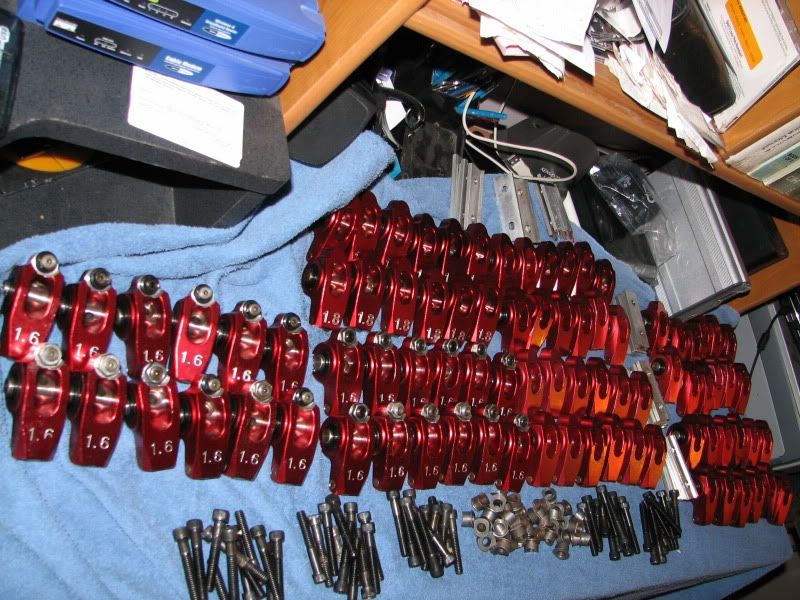
Harland Sharp 1.9 Rockers: A set or 7 found their way into my heart. They are sitting here refreshed and ready to install. Being that I was aiming for an LS and this car is a GS with a little more power, Installed
Powerlog: I have one, it'll go on the car.
Dual exhaust with SLP fascias:Regals were born with one exhaust cutout in the bumper cover. A bumper cover that hangs low enough to make the oldest prude happy. When adding duals you must cut the cover. SLP made fascia'* to put on both sides and make it look good. Got a 3" downpipe and full catback, ready to be put on the car.

Full Body Undercoating: A friend gave me about 8 cans of 3M Rubberized Undercoating. Car was on the lift and is fully coated from bumper to bumper.
POR 15: In looking the car over, the only real spots that looked to be rusty (surface were the front and rear bumpers as well as the lower radiator support. These have been coated with POR 15 when the car was undercoated.
HUD: I consider it a necessary item. Wiring was prepped for install.


Switch prepped


Monte Carlo DIC/compass/sunroof switch/homelink: Have chosen not to do this, the DIC info operates independently of the DIC in the cluster. Looking for other options.

Autodim compass/homelink mirror: With the decision around the overhead console and a standard feature (broken) Donnelly mirror, I saw a need. The only thing this doesn't supply is lights under the mirror. Can't seem to find one of those.

Door lights: I found out that 00+ Regals don't have the door lights, only reflectors. Being that I planned on running the puddle lights off the door light circuit, which is not there. I picked up the door lights and entire door wiring from the mirrors to the interior of the car, including speakers. I prepped the wiring for the puddle lights and interior lights. the wires were added into the connectors at the right places through the door jamb and connected to the wiring by the front door sills.


Speakers and headunit: Picked up Boston Acoustics GTA-1005 5 channel amp, SC50 component 5.25'* and SC90 6x9'*. Sub is a G3 10" Boston Acoustics sub. Headunit is a Pioneer AVH-P3200BT DVD capable bluetooth ready unit. Cabling from KnuKnoncepts.
Knu Kit, added speaker wire for a total of 80 feet and another 2 channel RCA http://www.knukonceptz.com/productDe...rodID=KFX-AK44.
Details in total are
18 Feet 4 Gauge Red Kolossus Fleks Power Wire
3 Feet 4 Gauge Smoke Kolossus Fleks Ground Wire
One Waterproof Mini-ANL Fuse Holder with 120A Fuse
One 6 Meter 4 Channel Karma SS RCA Cable
One 6 meter 2 Channel Karma SS RCA Cable
20 Feet Karma SS 12 Gauge Speaker Wire (up'd to 80 feet)
2 Gold Plated 4 Gauge Ring Terminals, 2 Gold Plated 4 Gauge Spade Terminals
6 feet split loom, 20 feet of remote wire, and wire ties


Added the Pioneer backup camera with park assist/night vision, and HD radio modules. Had to add a rear USB cable (by soldering to the headunit) because no other Pioneer product will control the iPod w/o wires hanging off the front of the headunit. Now all wiring is hidden from sight.

Viper 5901 car alarm/starter has been purchased and installed as weill with a window module (not yet installed). The basics are that it will allow me to start the car from a mile away and provide an alarm to ward off unfriendlies. This gives me opening windows in the summer and heated seats/rear defroster in the winter. Being that it'* a long walk from the building to the parking lot the 1 mile of range should come in handy.
Good cupholder: If you know Regals, the chance of a good cupholder is near 20%. I have found and fixed one that will go into the car if it'* the right color and needs one. From the dealer these are $150

Heated Seats: Let'* admit it. In the winter this is the way to go. The car didn't come with them, I'll add them. I have both sides from Grand Prix'* ready for install. The harness under the carpet was prewired for heated seats. All that needs to be done is install the heating element pads. Installed!
LED Brake lights/etc: There is a flasher that you modify to use with LED bulbs w/o needing special things, EP29
Puddle Lights: They will be in the mirror housing and project down when the car is unlocked.
From Oznium and totally waterproof. These project a lot of light.

Turn Signals in Mirrors: I had a set of the LED signal pods waiting to be installed. Time to work over a set of mirrors and make this happen.


Sequential Turn Signal Tail Lights: I had to.
Cluster: It is common for these clusters to have dim digital displays from bad resistors. Replaced them and all is good.

Center console: Couldn't leave well enough alone. I added Intrigue flip out cigarette lighters to both sides of the console. Normally there'* one on the passenger side and to remove the console from the car you destroy it. (it'* in the FSM). I've added one and swapped them out.

125 amp alternator: While adding the ZZP upgrade wire from the relay fuse box to the alternator, I installed a Bonneville/Park Ave 125amp. This should help with any strain the amplifier/headunit may put on the charging system.


Projector Headlights: Somehow Ben convinced me into a set of Lexus RX330 lights. Need to be put into some Regal housings. Pretty neat setup. Thanks to Rob for willing his to me.
E46 BMW Fog Lights: A slightly different look that takes a 9006 bulb. I have an 880 HID kit, guess it'* time to order a 9006 kit. awaiting install.

Fuel Filter: High flow fuel filter comes off a 2004 Tahoe Flex vehicle. Uh..haven't installed yet.
Braided fuel lines: Not sure how, but I ordered everything to do them. On hold
Cabin Air Filter: Automatically purchased because they are always missing or horrible. Installed
O2 Sensor: At $35 I ordered one as a spare/good to have around if the new car needs it. Installed
LIM Gaskets: There is a set on the shelf for the new car. Installed
Rims and tires, Due to the peeling feature of 4 sets of chrome wheels and not being able to come up with four good rims out of four full sets, I pulled the trigger on 2007 Buick Lucerne CXS rims and Bridgestone Potenza RE960AS Pole Position tires in 245/45/18. All recommended by Max and approved by Pat. Great setup guys.


My plan was to buy a car, jack it up and pull the seats, center console, carpet, pillars, rear deck, dash bezel, and door panels. Wash carpet and thoroughly clean seats and interior parts. Then pull the windows and regulators out of the doors. Drop the glass at the tint shop for tinting, and fix the regulators before they break by inserting some metal into the area where the plastic is the weakpoint. I'll cut the dash for the HUD install and wire it up, get a basic fit on the headunit and cut if needed. Determine how the DIC will be mounted to the roof and begin applying sound proofing to all doors, floor, rear deck and maybe the roof where possible. While that is drying, the engine will be supported and the subframe and oil pan will be changed. Struts installed if applicable. F body brakes, rear brakes and new brake lines will be installed and well bled with a power bleeder. Drag arms, lateral arms and toe links installed. Strut tower bars will be installed. Install HID headlights, foglights and all exterior LED lights. By now the sound proof coating should be dry. Run all cables and wires for the headunit/amps/speaker install. Mount amps and speakers. Locate and solder into turn signal and interior lighting wiring by doors, run the wiring into the doors. Run the LED and puddle light into the mirrors and put the turn signal mirrors on. Complete headunit and hud install. Install LED bulbs throughout interior and reinstall headliner with DIC. If needed install heaters in seats and run wiring into console. Reinstall carpet, console seats, windows/regulators, door panels. Get alignment and have rear window tinted, then reinstall rear deck.
As of 05/22/2010 it looks like this.
I'm planning on getting a 2000+ Regal with sunroof and fold down back seat. While I look for the car, I've started picking up parts that I want to be on the car. These mods will go on the car that will become the DD for two or three years. I'm pulling parts together as I find them and appreciate opinions on whether things are good/bad/no difference from stock etc. Parts I already have are bolded.
Car: Purchased 4/30/2010
Sways:
GMPP front and rear bars. They are in the pic somewhere.
EndlinksFront: Energy Suspension urethane 9.8122G (G denotes black, R is for red)
Rear: Moog K662 (Same ones Rob used)
Center bushings The W body guys swear the center sway bushings make more of a difference than the end links. I've done both on the Bonnie, and the centers did make a much bigger difference.
Front: Energy Suspension urethane 3.5131G (I considered the greaseable, ES only offers 33mm and 35mm)
Rear: Energy Suspension urethane 9.5123G
Dorman Control Arms: These are GTP control arms. The subframe, sways and everything being new bushing wise facilitated me ordering them for $72 each from Rockauto.
F body brakes: One question was raised by a buddy. Will the spare fit if a tire is shot? No, but you shouldn't run a spare on the front of a FWD, therefore you swap a rear to the front and there is no fitment issues, or use a Bonneville spare.
Drilled Slotted Rotors: R1 Concepts, a set of scorched (no break in or bedding) pads were picked up with the rotors. Update 11/9/10 the rotors have been on for a good 6 months and show no signs of rust. I am pleased with them in all respects so far.
Painted to clean and hide them from sight when they are on the car.
Rear brakes: Decided to go with 05-08 GP rear brakes. The E brake is built into the caliper, whereas the Regal E Brake is an inner drum on the disc setup. They are a direct bolt up.
Stainless Goodridge brake lines: I've done the research on spongy brakes after upgrading.
GXP brake pedal:Another item to help fight a lower pedal due to the caliper pistons using more fluid. It has a different rate and therefore the pedal grabs at the same point as before. Many say the lower pedal is not material, I'm going all the way though. Chosen not to do this mod after feeling the pedal....there is no need in my mind.
Strut tower bars: Front and rear both. Happened to find a set with the Don Rome brackets.
Trailing Arms, Lateral Arms, Toe Links: http://www.westshorefabricators.com/WBody/index.htm
Compared to BMR the quality seems to be equal with $200 less price tag. These have arrived, I'm beyond impressed.
Full poly engine mounts: Thanks to WBS for a great black friday sale. This is the dogbone, front mounts, both trans and engine mounts. IIRC I ordered them in black to keep them from standing out. One item to note is that the engine mount being solid means it'* simply an unfilled hydrauilic. I found it necessary to add 1/2" spacer to the mount with the aluminum subframe to maintain proper height.
Installed in mounts, I retapped the bolt holes and lubed them to keep them nice until install time.
Struts and drop: I have a set of KYB GR2 rear struts and mounts. A 1" drop would help the handling. Picked up a set of matching struts for the front with mounts. I decided to go with Vogtland springs for a .9" drop.
Aluminum W body oil pan w/mount as part of it: If you've never seen the big bracket on a W body that surrounds the oil pan and nearly makes changing the gasket a major pain. This pan has the mount attached to it and will be much easier to work with overall.
Cleaned and put new solid mount on it.
Aluminum cradle: Found in the Monte'* and some Impala'* the aluminum cradle weighs about 25-35 lbs lightger and is said to be stronger. As well, it will facilitate swapping the oil pan. Actual weight of this cradle is 44lbs.
Harland Sharp 1.9 Rockers: A set or 7 found their way into my heart. They are sitting here refreshed and ready to install. Being that I was aiming for an LS and this car is a GS with a little more power, Installed
Powerlog: I have one, it'll go on the car.
Dual exhaust with SLP fascias:Regals were born with one exhaust cutout in the bumper cover. A bumper cover that hangs low enough to make the oldest prude happy. When adding duals you must cut the cover. SLP made fascia'* to put on both sides and make it look good. Got a 3" downpipe and full catback, ready to be put on the car.
Full Body Undercoating: A friend gave me about 8 cans of 3M Rubberized Undercoating. Car was on the lift and is fully coated from bumper to bumper.
POR 15: In looking the car over, the only real spots that looked to be rusty (surface were the front and rear bumpers as well as the lower radiator support. These have been coated with POR 15 when the car was undercoated.
HUD: I consider it a necessary item. Wiring was prepped for install.
Switch prepped
Monte Carlo DIC/compass/sunroof switch/homelink: Have chosen not to do this, the DIC info operates independently of the DIC in the cluster. Looking for other options.
Autodim compass/homelink mirror: With the decision around the overhead console and a standard feature (broken) Donnelly mirror, I saw a need. The only thing this doesn't supply is lights under the mirror. Can't seem to find one of those.
Door lights: I found out that 00+ Regals don't have the door lights, only reflectors. Being that I planned on running the puddle lights off the door light circuit, which is not there. I picked up the door lights and entire door wiring from the mirrors to the interior of the car, including speakers. I prepped the wiring for the puddle lights and interior lights. the wires were added into the connectors at the right places through the door jamb and connected to the wiring by the front door sills.
Speakers and headunit: Picked up Boston Acoustics GTA-1005 5 channel amp, SC50 component 5.25'* and SC90 6x9'*. Sub is a G3 10" Boston Acoustics sub. Headunit is a Pioneer AVH-P3200BT DVD capable bluetooth ready unit. Cabling from KnuKnoncepts.
Knu Kit, added speaker wire for a total of 80 feet and another 2 channel RCA http://www.knukonceptz.com/productDe...rodID=KFX-AK44.
Details in total are
18 Feet 4 Gauge Red Kolossus Fleks Power Wire
3 Feet 4 Gauge Smoke Kolossus Fleks Ground Wire
One Waterproof Mini-ANL Fuse Holder with 120A Fuse
One 6 Meter 4 Channel Karma SS RCA Cable
One 6 meter 2 Channel Karma SS RCA Cable
20 Feet Karma SS 12 Gauge Speaker Wire (up'd to 80 feet)
2 Gold Plated 4 Gauge Ring Terminals, 2 Gold Plated 4 Gauge Spade Terminals
6 feet split loom, 20 feet of remote wire, and wire ties
Added the Pioneer backup camera with park assist/night vision, and HD radio modules. Had to add a rear USB cable (by soldering to the headunit) because no other Pioneer product will control the iPod w/o wires hanging off the front of the headunit. Now all wiring is hidden from sight.
Viper 5901 car alarm/starter has been purchased and installed as weill with a window module (not yet installed). The basics are that it will allow me to start the car from a mile away and provide an alarm to ward off unfriendlies. This gives me opening windows in the summer and heated seats/rear defroster in the winter. Being that it'* a long walk from the building to the parking lot the 1 mile of range should come in handy.
Good cupholder: If you know Regals, the chance of a good cupholder is near 20%. I have found and fixed one that will go into the car if it'* the right color and needs one. From the dealer these are $150
Heated Seats: Let'* admit it. In the winter this is the way to go. The car didn't come with them, I'll add them. I have both sides from Grand Prix'* ready for install. The harness under the carpet was prewired for heated seats. All that needs to be done is install the heating element pads. Installed!
LED Brake lights/etc: There is a flasher that you modify to use with LED bulbs w/o needing special things, EP29
Puddle Lights: They will be in the mirror housing and project down when the car is unlocked.
From Oznium and totally waterproof. These project a lot of light.
Turn Signals in Mirrors: I had a set of the LED signal pods waiting to be installed. Time to work over a set of mirrors and make this happen.
Sequential Turn Signal Tail Lights: I had to.
Cluster: It is common for these clusters to have dim digital displays from bad resistors. Replaced them and all is good.
Center console: Couldn't leave well enough alone. I added Intrigue flip out cigarette lighters to both sides of the console. Normally there'* one on the passenger side and to remove the console from the car you destroy it. (it'* in the FSM). I've added one and swapped them out.
125 amp alternator: While adding the ZZP upgrade wire from the relay fuse box to the alternator, I installed a Bonneville/Park Ave 125amp. This should help with any strain the amplifier/headunit may put on the charging system.
Projector Headlights: Somehow Ben convinced me into a set of Lexus RX330 lights. Need to be put into some Regal housings. Pretty neat setup. Thanks to Rob for willing his to me.
E46 BMW Fog Lights: A slightly different look that takes a 9006 bulb. I have an 880 HID kit, guess it'* time to order a 9006 kit. awaiting install.
Fuel Filter: High flow fuel filter comes off a 2004 Tahoe Flex vehicle. Uh..haven't installed yet.
Braided fuel lines: Not sure how, but I ordered everything to do them. On hold
Cabin Air Filter: Automatically purchased because they are always missing or horrible. Installed
O2 Sensor: At $35 I ordered one as a spare/good to have around if the new car needs it. Installed
LIM Gaskets: There is a set on the shelf for the new car. Installed
Rims and tires, Due to the peeling feature of 4 sets of chrome wheels and not being able to come up with four good rims out of four full sets, I pulled the trigger on 2007 Buick Lucerne CXS rims and Bridgestone Potenza RE960AS Pole Position tires in 245/45/18. All recommended by Max and approved by Pat. Great setup guys.
My plan was to buy a car, jack it up and pull the seats, center console, carpet, pillars, rear deck, dash bezel, and door panels. Wash carpet and thoroughly clean seats and interior parts. Then pull the windows and regulators out of the doors. Drop the glass at the tint shop for tinting, and fix the regulators before they break by inserting some metal into the area where the plastic is the weakpoint. I'll cut the dash for the HUD install and wire it up, get a basic fit on the headunit and cut if needed. Determine how the DIC will be mounted to the roof and begin applying sound proofing to all doors, floor, rear deck and maybe the roof where possible. While that is drying, the engine will be supported and the subframe and oil pan will be changed. Struts installed if applicable. F body brakes, rear brakes and new brake lines will be installed and well bled with a power bleeder. Drag arms, lateral arms and toe links installed. Strut tower bars will be installed. Install HID headlights, foglights and all exterior LED lights. By now the sound proof coating should be dry. Run all cables and wires for the headunit/amps/speaker install. Mount amps and speakers. Locate and solder into turn signal and interior lighting wiring by doors, run the wiring into the doors. Run the LED and puddle light into the mirrors and put the turn signal mirrors on. Complete headunit and hud install. Install LED bulbs throughout interior and reinstall headliner with DIC. If needed install heaters in seats and run wiring into console. Reinstall carpet, console seats, windows/regulators, door panels. Get alignment and have rear window tinted, then reinstall rear deck.


 02-17-2011, 04:53 PM
#8
DINOSAURUS BOOSTUS
Expert Gearhead
Thread Starter
Best of luck on that, I keep adding stuff all the time. A potential project is a heated steering wheel for next winter. Holler with any questions... everything i do is an open book for others.
On the sound system. I'm not a huge audio person and this was my first real install. Love the way it sounds and I've yet to get over half volume with the windows down. There'* absolutely no light dimming, even with the engine off. It is amazing how efficient the Boston stuff is and how well it all works together.
X.. You should really go read the entire gabillion page threads at the other forum to get a true idea of what went into doing this car.
02-17-2011, 05:51 PM
#9
Senior Member
True Car Nut
Join Date: Jun 2007
Location: New Lenox, IL
Posts: 2,478
Likes: 0
Received 0 Likes
on
0 Posts

Best of luck on that, I keep adding stuff all the time. A potential project is a heated steering wheel for next winter. Holler with any questions... everything i do is an open book for others.
On the sound system. I'm not a huge audio person and this was my first real install. Love the way it sounds and I've yet to get over half volume with the windows down. There'* absolutely no light dimming, even with the engine off. It is amazing how efficient the Boston stuff is and how well it all works together.
X.. You should really go read the entire gabillion page threads at the other forum to get a true idea of what went into doing this car.
On the sound system. I'm not a huge audio person and this was my first real install. Love the way it sounds and I've yet to get over half volume with the windows down. There'* absolutely no light dimming, even with the engine off. It is amazing how efficient the Boston stuff is and how well it all works together.
X.. You should really go read the entire gabillion page threads at the other forum to get a true idea of what went into doing this car.
02-17-2011, 05:51 PM
#10
Senior Member
True Car Nut
Join Date: Mar 2010
Location: Eaton Rapids MI
Posts: 2,964
Likes: 0
Received 0 Likes
on
0 Posts
That sounds great Bill I would like that however i think u have ulterior motives.. Ur car will look even sexier by comparison next to mine? LOL