
Removing door panel - 1997 SE
 05-15-2005, 08:57 AM
#11
Senior Member
True Car Nut

Although the instructions in Techinfo are for a 95, the only difference is that you don't have the two 7mm screws near the speakers in the front doors. Otherwise, all of the fasteners are the same.
There is no need to remove the grilles. You actually run the risk of breaking the small tabs that hold the grille in.
Yes, the lock slider will prevent the door panel from coming off so it must be removed. Use a screwdriver and pry upward on the front end of the slider while pressing inward on the back end. There is a small clip, sometimes it'* plastic built-in to the slider and sometimes it'* metal, that holds it agsinst the lock rod. This clip is right behind the orange section.
On my 93, there was actually 2 10mm bolts but my 97 only had one. I thought that maybe the door panel was removed once before and the others broke off. Keep an eye out for a second one. You must be a human super conductor cause 12v is not enough to shock us mere mortals.
There is a connector for the power mirror controls down the line about 8" or so. Pull the harness out of the door panel far enough to disconnect.
:?: :?: :?: You lost me on that one. There are 1-2 black push-in fasteners at the top of the armrest. It'* not necessary to remove any part of the armrest for door panel removal except for the trim and bolt described above.
No need to damage the switch controls by removing. The wires can simply be disconnected once the door panel is removed.

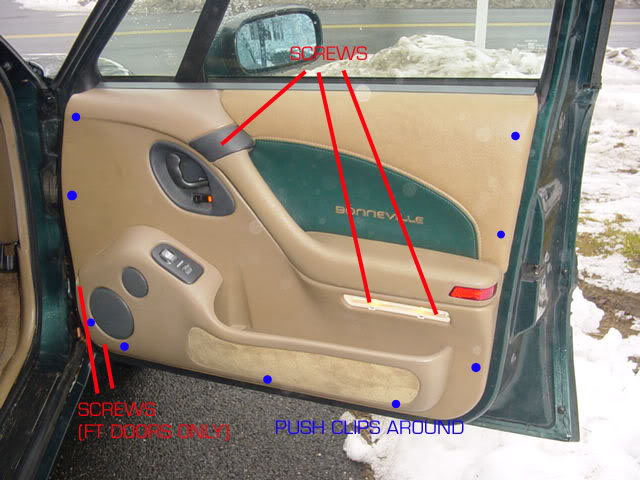
Here is a pic of my 93 door panel. Again, you will not have the two 7mm screws at the bottom front and may only have one 10mm screw behind the light. The blue dots indicate the approximate location of several push-in fasteners. These are pretty tight and usually require a trim tool to remove. When taking apart mt 97 donor car, I broke two from one door but all others survived. Invest in a trim fastener removal tool. Once the panel is loose from all it'* fasteners, the fun begins. That black strip at the top of the door panel is locked into the part of the door that also has the rubber thingy that touches the inside of the window. This can be a problem to release. I found it easier to remove that rubber part along with the door panel and detach it after it;* been removed from the car. It can be removed by prying upward while lifting upward on the door panel.
Let'* start with the easy parts. Remove the speaker grille, the card holder or tweeter grille, and pry off the panel behind the door handle.
Remove the Torx (#15) screw from behind the door handle. Slide the larger panel outward to remove it. The door lock will prevent it from coming all the way off, so it'll just hang around..
Pry off the white light with a flathead screwdriver. Pull the plug and toss it aside. It isn't wired very safely, so take care not to shock yourself. Behind that is a 10mm bolt. Remove that.
Pry off the panel at the top of the armrest. Disconnect the light and set it aside. (Note that the power mirror controls can't be removed, so this'll just hang in that case.) Remove the 10mm bolt that'* behind it.
Pull the black pins out of the black pegs holding the fixed handle. If you can't pull them out, then just break them off. I accidentally broke mine off and if you tighten the bolt all the way, you won't even notice.
Use a flathead screwdriver to pry off your window controls.
Here is a pic of my 93 door panel. Again, you will not have the two 7mm screws at the bottom front and may only have one 10mm screw behind the light. The blue dots indicate the approximate location of several push-in fasteners. These are pretty tight and usually require a trim tool to remove. When taking apart mt 97 donor car, I broke two from one door but all others survived. Invest in a trim fastener removal tool. Once the panel is loose from all it'* fasteners, the fun begins. That black strip at the top of the door panel is locked into the part of the door that also has the rubber thingy that touches the inside of the window. This can be a problem to release. I found it easier to remove that rubber part along with the door panel and detach it after it;* been removed from the car. It can be removed by prying upward while lifting upward on the door panel.
 05-15-2005, 02:06 PM
#12
Senior Member
Certified GM nut
Thread Starter
Originally Posted by randman1
Originally Posted by SignOfZeta
Pry off the white light with a flathead screwdriver. Pull the plug and toss it aside. It isn't wired very safely, so take care not to shock yourself. Behind that is a 10mm bolt. Remove that.
Originally Posted by randman1
Originally Posted by SignOfZeta
Pull the black pins out of the black pegs holding the fixed handle. If you can't pull them out, then just break them off. I accidentally broke mine off and if you tighten the bolt all the way, you won't even notice.
Here is a pic of my 93 door panel. Again, you will not have the two 7mm screws at the bottom front and may only have one 10mm screw behind the light. The blue dots indicate the approximate location of several push-in fasteners. These are pretty tight and usually require a trim tool to remove. When taking apart mt 97 donor car, I broke two from one door but all others survived. Invest in a trim fastener removal tool. Once the panel is loose from all it'* fasteners, the fun begins. That black strip at the top of the door panel is locked into the part of the door that also has the rubber thingy that touches the inside of the window. This can be a problem to release. I found it easier to remove that rubber part along with the door panel and detach it after it;* been removed from the car. It can be removed by prying upward while lifting upward on the door panel.[/quote]
Yeah, there'* only one bolt behind the light. All right, now I need a trim tool. Will something else work, like a small flathead screwdriver?
05-15-2005, 02:43 PM
#13
Senior Member
True Car Nut

Join Date: Jan 2005
Location: Montevideo, MN MWBF '05, '06, '07 WCBF '06 '07 survivor
Posts: 3,882
Likes: 0
Received 2 Likes
on
2 Posts

small breaker bar, think they are called wonder bars, will work in a pinch
they are flat and have a small v notch in them
they are flat and have a small v notch in them
05-15-2005, 03:51 PM
#14
Senior Member
True Car Nut

This is what I had in mind. It'll be worth the $10 or so. You should be able to find these at most larger auto parts stores. I use a Blue Point (Snap-On) tool that you squeeze like a pair of tin snips and it pops the fasteners out. It works very well and is worth every penny if you do a lot of interior work.
05-26-2005, 06:34 PM
#15
Senior Member
Certified GM nut
Thread Starter
Originally Posted by BillBost37
I can't help but wonder about your message...speeding down CT roadways...
Ever see the rest of us speeders in our bonnies?
Ever see the rest of us speeders in our bonnies?
Anyway, near me are an Autozone, Pep Boys, Napa Auto Parts and an Internet connection. Where can I likely find a trim tool (preferably offline)?
05-26-2005, 08:52 PM
#16
Senior Member
True Car Nut

On SSEI.. there'* no 2 screws on the side of the speaker and the center bolt is here.. behind the door light
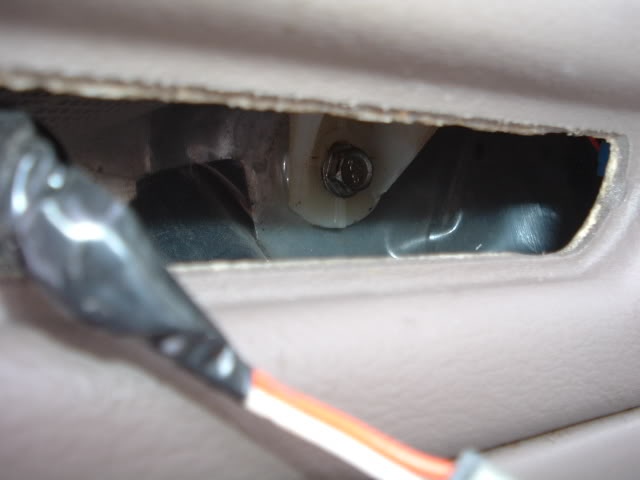
Mustafa has been too drunk to update the techinfo.. but mind you I haven't checked cause I"m tryin to catch up to him..
Mustafa has been too drunk to update the techinfo.. but mind you I haven't checked cause I"m tryin to catch up to him..

Thread
Thread Starter
Forum
Replies
Last Post
DaveSac11789
Detailing & Appearance
9
02-26-2006 12:51 PM