
Need help with some "leftovers" after replacing a cracked head.
 04-20-2010, 12:23 AM
#1
Junior Member
Thread Starter

Join Date: Aug 2009
Posts: 2
Likes: 0
Received 0 Likes
on
0 Posts

I'd like to start off with a slight disclaimer, I did search a little bit and look through about 10 pages of attachment pictures up top, but didn't find anything that would definitively answer my questions....
BACKGROUND
I had a cracked front head which I have replaced. I have rebuilt a lot of engines, but they were mainly old Chevy 350'* & 454'* etc which we raced way back when. So, to make a long story short I didn't pay as close of attention as I should have in the disassembly process on what I though would be insignificant details that would easily be worked out as I put together the bigger components. I have a few brackets that I am not sure where they go. I spent a couple/few hours today looking through my Haynes manual and google pictures trying to find a good shot of what I needed. I made basically zero progress.
PROBLEM
#1 - Couple of brackets that I can't seem to figure out where they go.Any pictures you may have would be greatly appreciated, but simple guidance is very welcome as well.
#2 - The alternator currently only has a plug in the side of it, and I'm almost certain it also had a wire screwed to one of the studs on the back, but I can't find this wire so I'm thinking maybe I am just assuming there was a wire like the old GM cars alternators?
PICTURES OF MY ISSUES
The last picture (the one of the alternator) shows how I sorta have it mounted. I'm not sure that the bracket at the back is correct or not. But, that also shows where I *think* a wire should be, but I can't find the wire and at this point I was so frustrated by the inability to figure out where the brackets went, I didn't spend a ton of time looking for something that may or may not be there.
P.*. The vehicle is bone stock daily driver with no aftermarket upgrades/add-ons that I am aware of. I've had it for about 8 months now.
Thank you to anyone who can provide any assistance to me on these issues.
 04-20-2010, 02:09 AM
#2
Member
Posts like a V-Tak
Join Date: Jan 2010
Location: Mercer, PA
Posts: 52
Likes: 0
Received 0 Likes
on
0 Posts
first picture i think is the plastic wire loom for the front spark plug wires. Attached to the front of the valve cover. I don't have one on my anymore.
second picture is the heat shield around the EGR valve. I'm supercharged but it should be between the throttle body and the fire wall.
pictures 3 and 4 i'm not sure
second picture is the heat shield around the EGR valve. I'm supercharged but it should be between the throttle body and the fire wall.
pictures 3 and 4 i'm not sure
04-20-2010, 06:10 AM
#3
Retired


Certified Car Nut


SSEILMNOP is correct on the first 2.
Third one looks familiar, but I can't place it.
Fourth one looks like the alternator bracket. It mounts on the rear bank head/LIM bolts and mounts to the backside of the alternator.
My 95 did not come with one, and my 97 did. After engine swapping, I never bothered with the alternator bracket.
Third one looks familiar, but I can't place it.
Fourth one looks like the alternator bracket. It mounts on the rear bank head/LIM bolts and mounts to the backside of the alternator.
My 95 did not come with one, and my 97 did. After engine swapping, I never bothered with the alternator bracket.
__________________
Retired Administrator
Retired Administrator
04-20-2010, 07:52 AM
#4
DINOSAURUS BOOSTUS
Expert Gearhead
Pictures
#1 Front valve cover plug wire holder. This has two grooves on the back of it that slide onto pieces on the front of the VC and then clip to the bottom lip of the cover.
#2 EGR shield. This will go from the stud sticking up (driverside, closest plenum bolt to the TB) to the bracket that we'll assemble with some other picture parts.
#3 Piece 1 of bracket. This piece bolts to the head. One of the two big holes goes to the head by the base of the EGR and the other fits in a U shaped area that is cut out of the lower manifold and gasket. Once bolted the part in picture #2 EGR shield should cup around the EGR, put one hole over the stud at the back of the manifold as mentioned in #2 then a small bolt holds it to the bracket which I called piece 1 because it'* the first piece of the bracket to be bolted to the motor.
#4 Now take this piece off the alternator and bolt it to the top of piece 1 of the bracket. It uses two 10mm headed bolts for this and then gives the alternator a hole in the end of the bracket to bolt to using the hole closest to the firewall in the alternator.
Here'* the best picture I could find.
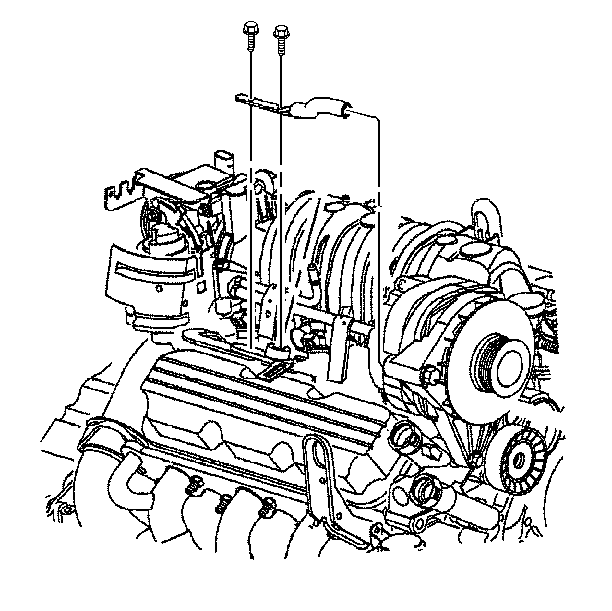
If you still have problems with the bracketry, I have an L36 at home I can get a better pic for you.
Now.. go to the battery and follow the smaller battery cable, it should have a clip at the radiator and then travel up onto the passenger end of the motor. That cable connects to the stud on the back of the alternator. This is how the battery is charged.
#1 Front valve cover plug wire holder. This has two grooves on the back of it that slide onto pieces on the front of the VC and then clip to the bottom lip of the cover.
#2 EGR shield. This will go from the stud sticking up (driverside, closest plenum bolt to the TB) to the bracket that we'll assemble with some other picture parts.
#3 Piece 1 of bracket. This piece bolts to the head. One of the two big holes goes to the head by the base of the EGR and the other fits in a U shaped area that is cut out of the lower manifold and gasket. Once bolted the part in picture #2 EGR shield should cup around the EGR, put one hole over the stud at the back of the manifold as mentioned in #2 then a small bolt holds it to the bracket which I called piece 1 because it'* the first piece of the bracket to be bolted to the motor.
#4 Now take this piece off the alternator and bolt it to the top of piece 1 of the bracket. It uses two 10mm headed bolts for this and then gives the alternator a hole in the end of the bracket to bolt to using the hole closest to the firewall in the alternator.
Here'* the best picture I could find.
If you still have problems with the bracketry, I have an L36 at home I can get a better pic for you.
Now.. go to the battery and follow the smaller battery cable, it should have a clip at the radiator and then travel up onto the passenger end of the motor. That cable connects to the stud on the back of the alternator. This is how the battery is charged.
04-21-2010, 03:31 AM
#5
Junior Member
Thread Starter
Join Date: Aug 2009
Posts: 2
Likes: 0
Received 0 Likes
on
0 Posts
Thank you to everyone for all the help. I was able to get it back up and running. I did have a couple of other little leftovers, but I couldn't see what they really had to do with anything, and it is running better than ever.
A big batch of positive karma to everyone who helped
A big batch of positive karma to everyone who helped

Thread
Thread Starter
Forum
Replies
Last Post
PRD2BDF
Your Ride: GM Pictures & Videos
36
11-22-2006 09:00 PM
maxguitarhero
Detailing & Appearance
12
02-04-2006 02:42 PM
Hans
Your Other Rides: Pics & Videos
19
08-17-2005 08:32 PM