My UIM LIM replacement(UPDATE__ ITS ALIVE)
 04-25-2007, 12:41 AM
#1
Member
Posts like a V-Tak
Thread Starter

Join Date: Feb 2003
Location: Hobart, Indiana
Posts: 54
Likes: 0
Received 0 Likes
on
0 Posts

Started my UIM LIM teardown today. (95 SE N/A, 152,000 miles)
Good thing I did, my lowers were WASTED. Very brittle, particularly in the middle of each. Almost fell apart upon removal, but got it all clean.
The good news is I didnt find any coolant in the lifter valley, just a little dirty/greasy.
Hopefully Ill be ok with just a cleanup and LIM gaskets/UIM replacement.
My upper looked ok, until I poked around the EGR area. The coolant tabs (added by former owner, as I never used them)worked well, but I scraped a little and I found daylight. I think it could be sleeved though, as the only damage I can find is inside EGR hole.
TB was nasty as well, needed a good cleaning. Took care of that, good to go now.
IAC area was super nasty!!!!
Went pretty easy, just took my time, about a half a day, with plenty of breaks..
I did snap a stud off on the back exhaust manifold flange, I guess Ill have to fix that too!!!
Just drill it out and replace right???
Ill post some pics if I can borrow a camera.
Thanks for the help and how-tos. The info really helps!!!
 Bob
Bob
Good thing I did, my lowers were WASTED. Very brittle, particularly in the middle of each. Almost fell apart upon removal, but got it all clean.
The good news is I didnt find any coolant in the lifter valley, just a little dirty/greasy.
Hopefully Ill be ok with just a cleanup and LIM gaskets/UIM replacement.
My upper looked ok, until I poked around the EGR area. The coolant tabs (added by former owner, as I never used them)worked well, but I scraped a little and I found daylight. I think it could be sleeved though, as the only damage I can find is inside EGR hole.
TB was nasty as well, needed a good cleaning. Took care of that, good to go now.
IAC area was super nasty!!!!
Went pretty easy, just took my time, about a half a day, with plenty of breaks..
I did snap a stud off on the back exhaust manifold flange, I guess Ill have to fix that too!!!
Just drill it out and replace right???
Ill post some pics if I can borrow a camera.
Thanks for the help and how-tos. The info really helps!!!
 04-25-2007, 01:00 AM
#2
Senior Member
True Car Nut

Way to go. I hope you used an APN UIM or provided a heat shield for your new upper. And also changed out that fat ol' 3/4" stovepipe for a smaller one.
PB (Power Blaster) penetrating oil does a remarkable job if you have enough of the stud sticking up to drive a stud extractor onto it. PB works best if it is applied, then tapped with a hammer to encourage penetration, then repeated a couple of times over several hours. If that fails, grind the broken stud or bolt flat, center punch it and carefully drill it out. You can buy left-hand drills that sometimes will pull out a stuck bolt as you near the thread roots. Otherwise, just drill and re-tap the hole.
PB (Power Blaster) penetrating oil does a remarkable job if you have enough of the stud sticking up to drive a stud extractor onto it. PB works best if it is applied, then tapped with a hammer to encourage penetration, then repeated a couple of times over several hours. If that fails, grind the broken stud or bolt flat, center punch it and carefully drill it out. You can buy left-hand drills that sometimes will pull out a stuck bolt as you near the thread roots. Otherwise, just drill and re-tap the hole.
04-25-2007, 02:05 AM
#3
Member
Posts like a V-Tak
Thread Starter
Join Date: Feb 2003
Location: Hobart, Indiana
Posts: 54
Likes: 0
Received 0 Likes
on
0 Posts
Bill,
The APN is on order.
Tomorrow will be spent cleaning the lower manifold, gasket areas, and lifter valley.
Thanks for the tip on the broken stud.
I have some PB Blaster, Ill spray it down again tomorrow.
Any advice on how to get the old stovepipe out?? My dad suggested finding a socket that fits tightly over it, then gently work it out with pliers. Its really caked in there!!!
Bob
04-25-2007, 08:06 AM
#4
Junior Member
Posts like a Ricer Type-R

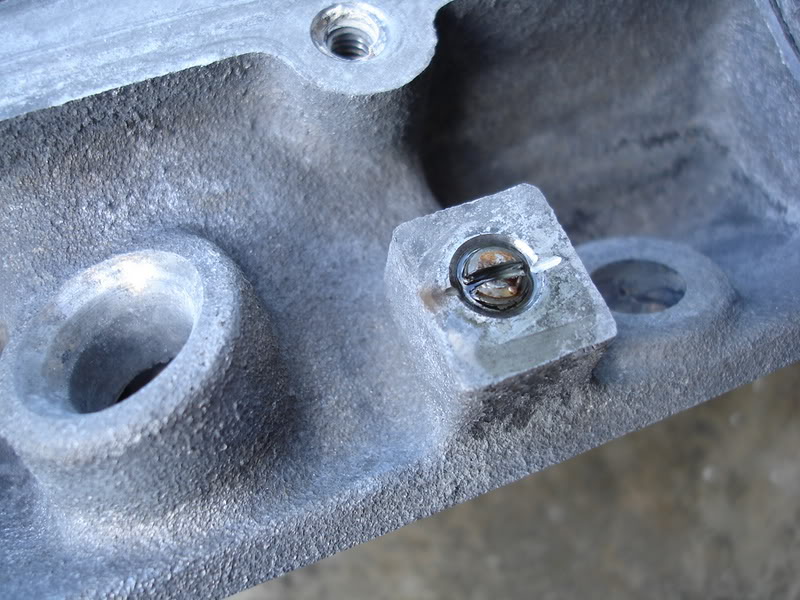
I slotted the broken studs on EK98'* car, and backed them out with a screwdriver. The process of slotting with a dremel heated and cooled them, releasing them when the expansion/contraction allowed the oil to penetrate. Took less than 5 minutes for both studs:
04-25-2007, 08:12 AM
#5
DINOSAURUS BOOSTUS


Expert Gearhead

If the slot doesn't work (always try it first) then drill and use an extractor available at Sears etc.
Reason behind drilling second is the mess, and that the drill turns in the same direction as tightening the bolt.
Reason behind drilling second is the mess, and that the drill turns in the same direction as tightening the bolt.
04-25-2007, 10:09 AM
#7
Senior Member
True Car Nut
To get the old stovepipe out, spray around the base of the pipe with PB, then slip a tight fitting socket inside the stovepipe. Then take a good bite with a pair of vise grips. (The socket will prevent the pipe from crushing allowing a much tighter grip.) Give the pipe a twist, and wiggle it up and out. Clean the carbon out of the bore so your new reduced diameter pipe will tap in with no troubles.
04-25-2007, 10:45 AM
#8
Member
Posts like a V-Tak

Join Date: Mar 2007
Posts: 48
Likes: 0
Received 0 Likes
on
0 Posts
Fm Will Wren
I slotted the broken studs on EK98'* car, and backed them out with a screwdriver......................
I slotted the broken studs on EK98'* car, and backed them out with a screwdriver......................
Fm Bill Buttermore
To get the old stovepipe out, spray around the base of the pipe with PB, then slip a tight fitting socket inside the stovepipe. Then take a good bite with a pair of vise grips. (The socket will prevent the pipe from crushing allowing a much tighter grip.)
To get the old stovepipe out, spray around the base of the pipe with PB, then slip a tight fitting socket inside the stovepipe. Then take a good bite with a pair of vise grips. (The socket will prevent the pipe from crushing allowing a much tighter grip.)
04-26-2007, 01:11 AM
#9
Member
Posts like a V-Tak
Thread Starter
Join Date: Feb 2003
Location: Hobart, Indiana
Posts: 54
Likes: 0
Received 0 Likes
on
0 Posts
Got the stovepipe out no problem.
Everything is clean, ready for parts.
After that, just need to fix the broken exhaust manifold stud...
Then Im rollin...
I will run fresh oil/filter for about 100 miles, then change it out again.
Would you recommend a syn or syn blend for the first change, or use my usual dino(10W30 thats on sale)
Ill keep you all informed on the progress.
Bob
04-26-2007, 01:18 AM
#10
Guest
Posts: n/a
For the first hundred or so run the dino..
__________________
Best Car Insurance | Auto Protection Today | FREE Trade-In Quote
__________________
Best Car Insurance | Auto Protection Today | FREE Trade-In Quote