Fuel Filter Change Project (potential tech FAQ addition?)
 08-29-2005, 11:46 AM
#1
Member
Posts like a V-Tak
Thread Starter

Join Date: Jan 2005
Location: New Canaan, CT
Posts: 55
Likes: 0
Received 0 Likes
on
0 Posts

Hi all,
Well I decided to replace the fuel filter in my 1995 Bonneville. I figured after 131,000 miles, it might need changing (yes I’m being sarcastic). I asked my brother for his help because he is incredible when it comes to working on cars. He pretty much did the whole project, while I was a couple of extra helping hands. I thought it would go quickly, but that was not to be. It was very rusty where the fuel line attached to the filter. It was so rusty that when my brother was just fitting the wrench to the nut, fuel started seeping out. When we were starting to do the work, I mentioned this site to my brother and that I wanted to document what we did. He was kind enough to take pictures and do a write up as well. His words and pictures follow.
Leif W.
1995 Bonneville
///////////////////////////////////////////
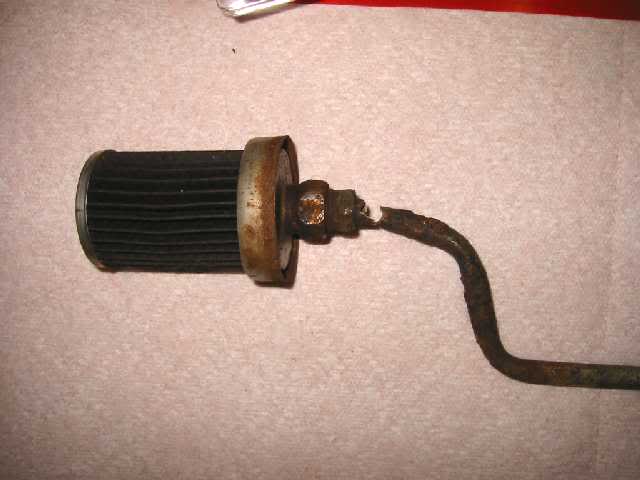
Filter01-Before - Or rather, during. After the fuel line broke, my brother realized this would be a pic-worthy project. This is what we were up against - a very rusted fuel line. So bad that simply trying to fit a flare-nut wrench onto the rusty nut caused the line to start leaking - it was that far gone. Despite lots of penetrating oil the line broke completely as soon as torque was applied.
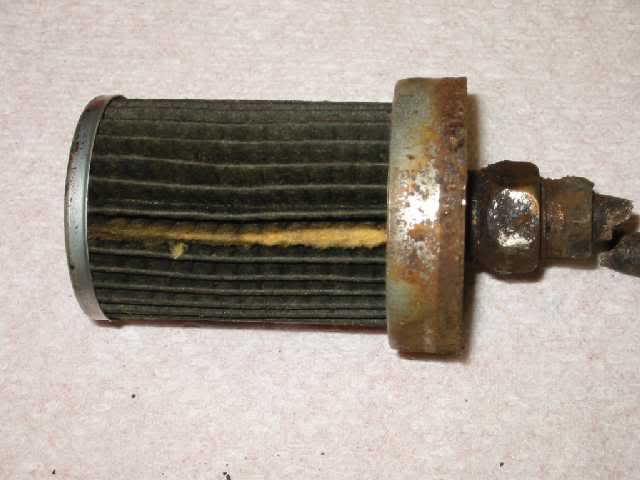
Filter02-Dirty - So why did we poke a sleeping bear? After all, the factory service manual says to replace the filter "as needed", with no specified interval. Then again, the factory service manual says the filter is located at the front of the car (hint: it'* not). Well, removing the old filter and cutting open the body shows that it was "needed". The bright stripe is the clean part of the filter (it'* a crimped portion that no fuel flows through). As you can see, the rest of the filter is quite dirty.
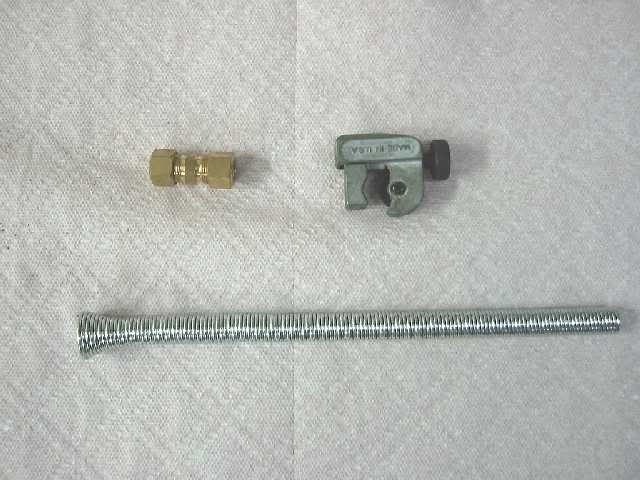
Filter03-Tools - Here'* what you'll need above and beyond regular flare-nut wrenches - a brass compression fitting for 3/8" O.D. (Outside Diameter) tube, a mini-tubing cutter, and a spring-bender for 3/8" diameter tubing. All of these pieces can be purchased at an auto parts store or even a Home Depot (check the plumbing section).
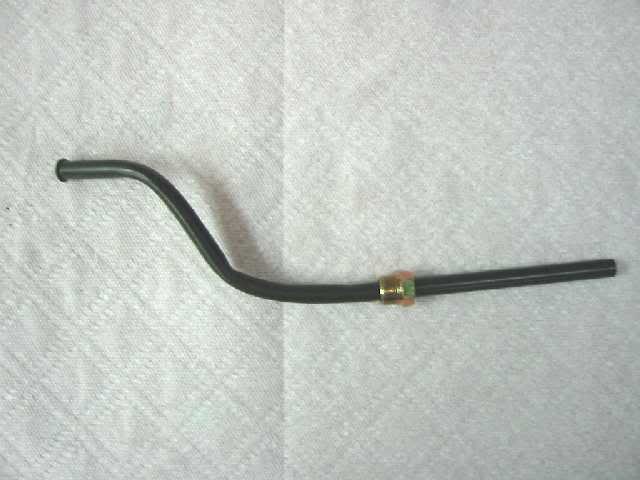
Filter04-Tubing - You'll also need this - a length of 3/8" OD steel tubing with flared ends. You only need about a foot. Auto parts stores sell various sizes of steel lines with flared ends and nuts. They're used for fixing brake lines and (of course) fuel lines. We bought the 30" length because that'* all they had. Turned out to be a good thing, for this picture is what you should NOT do - the nut should be up against the flared end (left side of pic) BEFORE you start bending. Once bent, you can't slide the nut in place. So we tossed that piece and used the other half of the tubing.
The tubing is bent by slipping the nut all the way to the end, then sliding the spring bender over the tube. We clamped the tube to a heavy workbench with a piece of wood and two C-clamps, then bent it to shape using the original tube as a guide. Obviously, a table-mounted vise would be easier. Once bent to shape, the spring is rotated while pushing to slide it off the tube. You have to push the spring off - like "chinese handcuffs", pulling just makes the spring tighter.
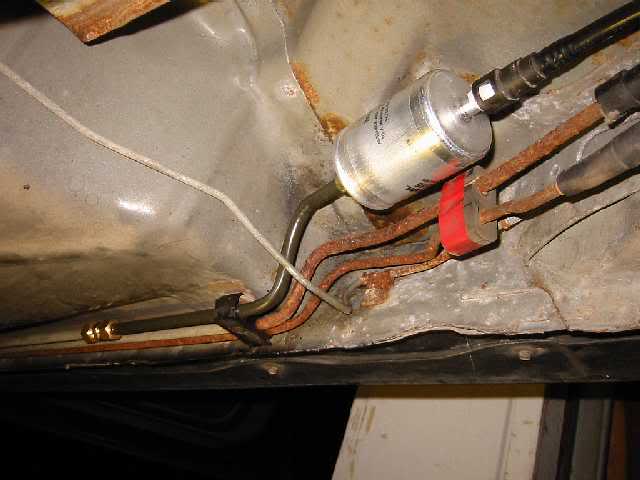
Filter05-Complete - Here'* the end result. The fuel line is snapped into plastic holders along the frame rail of the car. There'* *just* enough room to unsnap the line from the holders. This gives you enough flex to cut the line at a nice, clean, straight section. The compression fitting is put in place, the new fuel filter is installed and tightened, the lines snapped back in place, the line and filter is rotated into a nice position (ie - not touching anything), and then the compression fitting is tightened.
For the curious, the other two lines running parallel to the fuel supply line are the fuel-injection return line and the fuel-vapor vent line. The thin line running across all three is the brake line for the right-rear wheel.
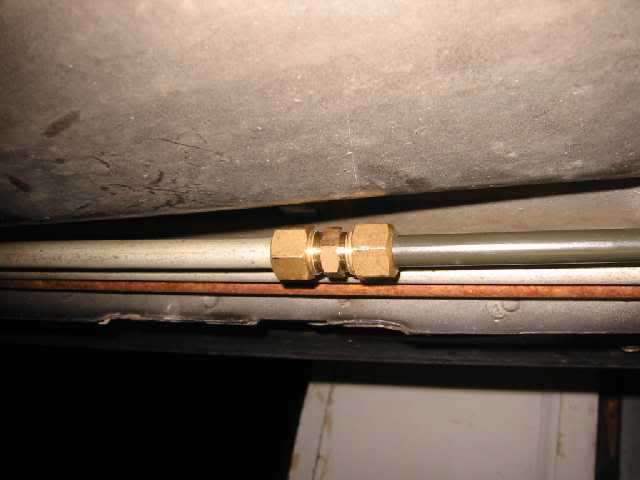
Filter06-CompFitting - Here'* a close-up of the compression fitting. You don't need a lot of torque on these nuts - just use about the same as you do on the fuel filter itself. Once in place, turn the ignition key to "RUN" (not START). You should hear the fuel pump run for a few seconds as it pressurizes the system. Now check underneath the car. If you observe any leaks or seepage, tighten things just enough to stop the leak, and a smidge more - that'* it. Too much can be too much!
Well I decided to replace the fuel filter in my 1995 Bonneville. I figured after 131,000 miles, it might need changing (yes I’m being sarcastic). I asked my brother for his help because he is incredible when it comes to working on cars. He pretty much did the whole project, while I was a couple of extra helping hands. I thought it would go quickly, but that was not to be. It was very rusty where the fuel line attached to the filter. It was so rusty that when my brother was just fitting the wrench to the nut, fuel started seeping out. When we were starting to do the work, I mentioned this site to my brother and that I wanted to document what we did. He was kind enough to take pictures and do a write up as well. His words and pictures follow.
Leif W.
1995 Bonneville
///////////////////////////////////////////
Filter01-Before - Or rather, during. After the fuel line broke, my brother realized this would be a pic-worthy project. This is what we were up against - a very rusted fuel line. So bad that simply trying to fit a flare-nut wrench onto the rusty nut caused the line to start leaking - it was that far gone. Despite lots of penetrating oil the line broke completely as soon as torque was applied.
Filter02-Dirty - So why did we poke a sleeping bear? After all, the factory service manual says to replace the filter "as needed", with no specified interval. Then again, the factory service manual says the filter is located at the front of the car (hint: it'* not). Well, removing the old filter and cutting open the body shows that it was "needed". The bright stripe is the clean part of the filter (it'* a crimped portion that no fuel flows through). As you can see, the rest of the filter is quite dirty.
Filter03-Tools - Here'* what you'll need above and beyond regular flare-nut wrenches - a brass compression fitting for 3/8" O.D. (Outside Diameter) tube, a mini-tubing cutter, and a spring-bender for 3/8" diameter tubing. All of these pieces can be purchased at an auto parts store or even a Home Depot (check the plumbing section).
Filter04-Tubing - You'll also need this - a length of 3/8" OD steel tubing with flared ends. You only need about a foot. Auto parts stores sell various sizes of steel lines with flared ends and nuts. They're used for fixing brake lines and (of course) fuel lines. We bought the 30" length because that'* all they had. Turned out to be a good thing, for this picture is what you should NOT do - the nut should be up against the flared end (left side of pic) BEFORE you start bending. Once bent, you can't slide the nut in place. So we tossed that piece and used the other half of the tubing.
The tubing is bent by slipping the nut all the way to the end, then sliding the spring bender over the tube. We clamped the tube to a heavy workbench with a piece of wood and two C-clamps, then bent it to shape using the original tube as a guide. Obviously, a table-mounted vise would be easier. Once bent to shape, the spring is rotated while pushing to slide it off the tube. You have to push the spring off - like "chinese handcuffs", pulling just makes the spring tighter.
Filter05-Complete - Here'* the end result. The fuel line is snapped into plastic holders along the frame rail of the car. There'* *just* enough room to unsnap the line from the holders. This gives you enough flex to cut the line at a nice, clean, straight section. The compression fitting is put in place, the new fuel filter is installed and tightened, the lines snapped back in place, the line and filter is rotated into a nice position (ie - not touching anything), and then the compression fitting is tightened.
For the curious, the other two lines running parallel to the fuel supply line are the fuel-injection return line and the fuel-vapor vent line. The thin line running across all three is the brake line for the right-rear wheel.
Filter06-CompFitting - Here'* a close-up of the compression fitting. You don't need a lot of torque on these nuts - just use about the same as you do on the fuel filter itself. Once in place, turn the ignition key to "RUN" (not START). You should hear the fuel pump run for a few seconds as it pressurizes the system. Now check underneath the car. If you observe any leaks or seepage, tighten things just enough to stop the leak, and a smidge more - that'* it. Too much can be too much!


 08-29-2005, 12:13 PM
#4
Junior Member
Posts like a Ricer Type-R

Great writeup, agreed.
As far as Techinfo is concerned, this one is a bit out there. I'm only aware of one other person who ever had to replace a rusty fuel line. Most fuel filter replacement jobs are very straightforward (although smelly).
Techinfo also has no provision for pics or graphics. You would have to host this as an HTML page for linking. With a long-term comittment.
That'* a nice repair, nonetheless.

 12-13-2005, 10:46 PM
#8
RIP
True Car Nut

I've had good luck using a set of vise grips on the fitting, and a good sized crescent wrench on the filter. Don't put so much force on the vise grips that you compress the fitting onto the tube (would take a bit, but I've seen it done.) Put most of your force into turning the filter, rather than the fitting.
**ediit** Oops, posted in the wrong thread - meant to post it in advise on breaking loose a rusted fuel filter?
**ediit** Oops, posted in the wrong thread - meant to post it in advise on breaking loose a rusted fuel filter?
12-13-2005, 10:54 PM
#9
Senior Member
Certified GM nut

Join Date: Feb 2004
Location: MI
Posts: 2,246
Likes: 0
Received 0 Likes
on
0 Posts
Heh, remember my lines. I am actually SO glad this didn't happen to me. I thought mine was bad though when I put my wrench on the flare nut, and there were no points on the nut. I scraped off all the rust, and there were no points to be found. Gotta love vice-grips.

Thread
Thread Starter
Forum
Replies
Last Post
rstrunk
1992-1999
7
12-13-2008 01:33 PM
mikeblue94
1992-1999
8
10-31-2004 03:20 PM