
Changing Heads On 1987 LeSabre
 10-24-2007, 02:53 PM
#1
Member
Posts like a V-Tak
Thread Starter

Join Date: Sep 2007
Location: North Central Texas
Posts: 37
Likes: 0
Received 0 Likes
on
0 Posts

I thought that I'd continue this conversation under a new topic, because there are over 40 posts in the original thread, which is located here:
http://www.bonnevilleclub.com/forum/...ic.php?t=86185
I'm going to remove the heads on the car; the model year and such is detailed in my signature, below my posts.
I know the cylinder locations:
Cylinder numbers (from the drivebelt end to the transaxle end, or passenger'* side to the driver'* side)
Front bank (or, radiator side): 1-3-5
Rear bank (or, firewall side): 2-4-6
Firing Order: 1-6-5-4-3-2
 However...
The other end(*) of the wire(*) :?:
Unlike the "distributor"- type, with one cap, and certain rotation direction (clockwise or counterclockwise), this one doesn't appear to be so easy to grasp.
Is there a guide or "key" available?
http://www.bonnevilleclub.com/forum/...ic.php?t=86185
I'm going to remove the heads on the car; the model year and such is detailed in my signature, below my posts.
I know the cylinder locations:
Cylinder numbers (from the drivebelt end to the transaxle end, or passenger'* side to the driver'* side)
Front bank (or, radiator side): 1-3-5
Rear bank (or, firewall side): 2-4-6
Firing Order: 1-6-5-4-3-2
The other end(*) of the wire(*) :?:
Unlike the "distributor"- type, with one cap, and certain rotation direction (clockwise or counterclockwise), this one doesn't appear to be so easy to grasp.
Is there a guide or "key" available?
 10-24-2007, 03:02 PM
#2
Guest
Posts: n/a
We can get a guide for you... But if its still on the original Coil and you look really close, under the wire and near the coil pack screw, you should see a number for each cylinder next to the coil tower 
__________________
Best Car Insurance | Auto Protection Today | FREE Trade-In Quote
__________________
Best Car Insurance | Auto Protection Today | FREE Trade-In Quote
10-24-2007, 06:27 PM
#3
Member
Posts like a V-Tak
Thread Starter
Join Date: Sep 2007
Location: North Central Texas
Posts: 37
Likes: 0
Received 0 Likes
on
0 Posts
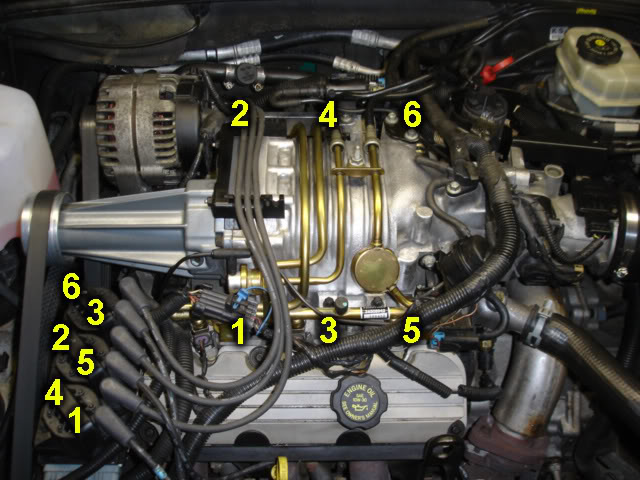
It'* a"Type II" coil/module assembly.
Three coils with the two towers on one side each.
Apparently, each cylinder is paired with its opposite cylinder:
(1-4, 5-2, 3-6)
Assuming this is correct, which one is which?
I marked everything before I removed them, earlier today.
But, how can I know that they were correct in the first place?
...other than "Did it run okay?"
By the way, the coil on the driver'* side is marked with a sticker that reads "03/12/87", but there are no etchings.
 10-24-2007, 09:06 PM
#5
Member
Posts like a V-Tak
Thread Starter
Join Date: Sep 2007
Location: North Central Texas
Posts: 37
Likes: 0
Received 0 Likes
on
0 Posts
Thanks, Technical Ted.
Yeah, it does help.
Mine'* placed a little differently.

(Excuse the mess!)
I don't quite know how to translate yours to mine.
Yeah, it does help.
Mine'* placed a little differently.
(Excuse the mess!)
I don't quite know how to translate yours to mine.
10-24-2007, 09:47 PM
#6
Senior Member
Certified GM nut

Join Date: Oct 2005
Location: Western New York
Posts: 1,942
Likes: 0
Received 0 Likes
on
0 Posts
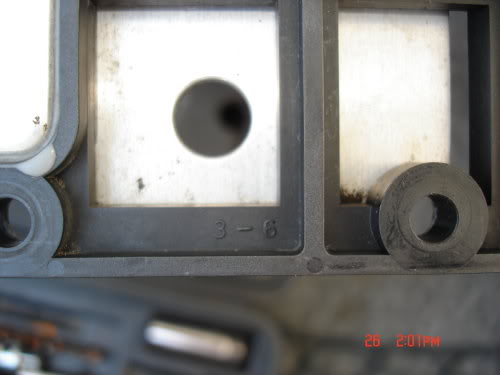
The coil next to the ICM wiring harness is 1/4, middle coil is 5/2 & coil farthest from wiring harness is 3/6. The numbers are also molded into the ICM- see pic.
10-24-2007, 11:15 PM
#7
Junior Member
Posts like a Ricer Type-R

And if it helps your routing any, you can 'mix' the two wires to each cylinder. Each coil fires twice. Waste-spark. So you can put 1 on 4 and 4 on 1, and it makes no difference.
With your odd placement, that may aid your routing somewhat if you need to.
With your odd placement, that may aid your routing somewhat if you need to.
10-25-2007, 12:08 AM
#8
Member
Posts like a V-Tak
Thread Starter
Join Date: Sep 2007
Location: North Central Texas
Posts: 37
Likes: 0
Received 0 Likes
on
0 Posts
Thanks, Technical Ted and willwren.
That'* what I needed to know.
Now, about the exhaust manifold.
If I pull the bolts, will the heads come off without my having to fuss with the pipes any further?
That'* what I needed to know.
Now, about the exhaust manifold.
If I pull the bolts, will the heads come off without my having to fuss with the pipes any further?
10-25-2007, 08:17 AM
#9
Junior Member
Posts like a Ricer Type-R
Yes, you can pull the bolts/studs and just lay them back (disconnect the crossover also). However, this won't make it any easier to clean the gasket surfaces. Once the cylinder heads are out of the car, I suggest removing the exhaust manifolds, cleaning them up, then putting them back. There are some restrictive internal welds that can be worked on.
Why are you pulling the cylinder heads in the first place?
Why are you pulling the cylinder heads in the first place?
10-25-2007, 10:31 AM
#10
Member
Posts like a V-Tak
Thread Starter
Join Date: Sep 2007
Location: North Central Texas
Posts: 37
Likes: 0
Received 0 Likes
on
0 Posts
It jumped time on Sunday, September 2nd, the day before Labor Day, and bent 3 valves.
I had the timing job done at a garage.
I had the timing job done at a garage.